Hello, Everybody! Welcome back to the Monkey Ranch. I have been missin’ y’all, and I know you’ve been missin’ me!
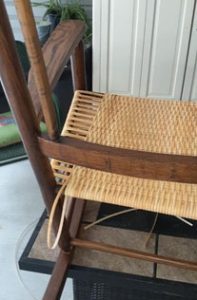
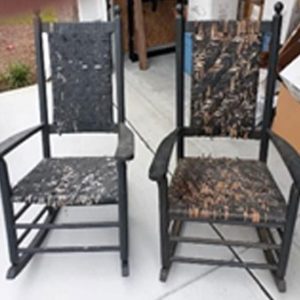 Several years ago I was able to get my hands on three wooden rocking chairs that spent many years rocking folks on my grandfather’s front porch. He passed away in 1956, and my grandmother passed away in 1983. So these chairs have been around a long, long time. Here is an picture of two of the chairs before I began my restoration. I cut away all of the old caning. I sanded the chairs all the way down to the raw wood. These chairs were painted by my granddad who died 69 years ago. So the old paint had to go. This took some effort, a fair amount of elbow grease and a large dose of patience. No use getting in a hurry. The rule is always, “If you want to take the fastest path, GO SLOW!”
I completed the sanding, cleaning process of every surface of the frame of the rockers. It felt more like a genuine “purging” of the chair’s old wooden soul. The next step was to give these old wooden bones a brand new skin. The first step was the application of a healthy dose of oil-based wood stain. Be prepared. To get this step right you got no choice but to get nasty. You need a can of wood stain and a rag. Take that rag and begin dipping and rubbing. I wanted a semi dark look so I choose Provencial as my stain color. It gave the wood a rich brown color without making the wood look too dark. I let this stain sit a couple of days to get really dry.
Since I intended to keep these chairs on my screen porch, I used spar urethane for exterior use. I applied at least three coats using a quality finishing brush. To get the finish I wanted I chose the semi-gloss urethane and lightly sanded after each coat. The chair frames now look like new money!
The Caning Process: Now, I was ready to start weaving the chair with new cane.
I used a 9mm ( ¼ inch) binding cane . You can easily find this cane on a number of internet sites. Here is a picture of a “hank” of binder cane.
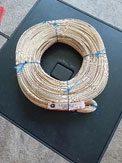
Each hank contains about 500 feet of binder cane strands. It will take about 3 hanks to complete the seat and the back of each chair.
The strands are curved on the top and flat on the bottom. I selected about three strands typically about seven or eight feet in length each. I put them in a tub of water and let them soak twenty minutes.
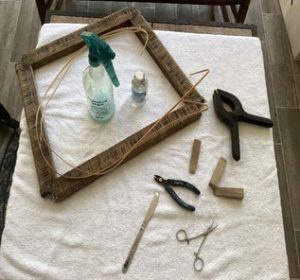
But, before we start the actual weaving, let me show you the tools (implements) you will need to have on hand.
The actual weaving process is a two-step process, base looping and the actual weaving.
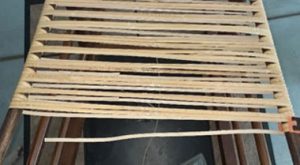 Here is a picture of the looping of a chair. This weave is the New England weave. As you can see, there are two long strands, then, you see two quick loops on each side. Then you repeat the two long strands and the two quick loops on each side. This looping pattern is continued until you have completely crossed the entire span. Now your base looping is done.
The second step is when you start your actual weave. Beginning at the back, you tuck your strand of cane underneath the first two long strands of the loop, over the next two long strands and repeat the over and under sequence until you completely cross the span of the chair. Pull the cane until you leave an twelve inch tail hanging out of the beginning side. Tuck the tail underneath the side of the chair in a two under, two over pattern on the underside of the seat. Back on top, pull the long strand as tight as you can. Turn the chair over and weave back across the bottom. Spray with water frequently to keep the strands wet. Begin your next run across the top beginning this time go over the first two strands then under the next two. Pull tight.
Make sure that you pull your strand very tight as you finish weaving each strand. Also, keep pushing your over/under strand tight up against the strand before it, using your wooden wedges.
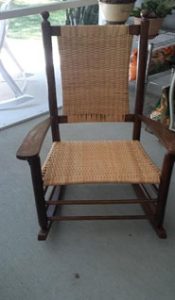
To the right is your finished chair with the New England weave on both the seat and the back of the rocker. You can also see the new finish on the wood frame of the chair. Compared to the pictures we started with this chair looks like “new money”! But it still sits and rocks like a very old, dear friend. Oh, and tales this chair could spin if it could talk.
This chair restoration diatribe is an overview of what this process entails. I ‘ve finished all three chairs and it is my intention to pass down a chair to the children. I envision that the children would treasure having a piece of family memorabilia once owned by their great granddad, and, restored and re-caned by dear old dad.
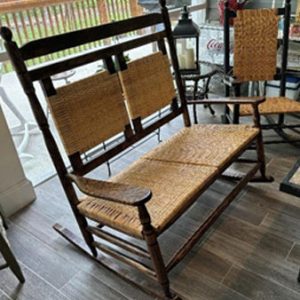
Here is a wooden double-rocker I reworked